Time to read: 9 min
Anodizing is one of the most common surface treatment options available for cnc aluminum. We’ve probably all seen anodized pieces used in a variety of applications, ranging from some of Apple’s iPhones and iPods to sprockets on motorcycles and karts. This article will walk you through the design considerations, as well as the applications, for anodizing.
While we can anodize other materials, we will focus on aluminum in this article, as it’s very widely used and holds a large percentage of the market share for anodized parts. The process is well-suited for aluminum parts made from a variety of different manufacturing processes, such as CNC machining, casting, and sheet forming.
Throughout this article, we will reference military specification MIL-A-8625 for many technical details. This is a common specification used in multiple industries, but it’s good to check for other requirements that may drive another specification.
Introduction to Anodizing
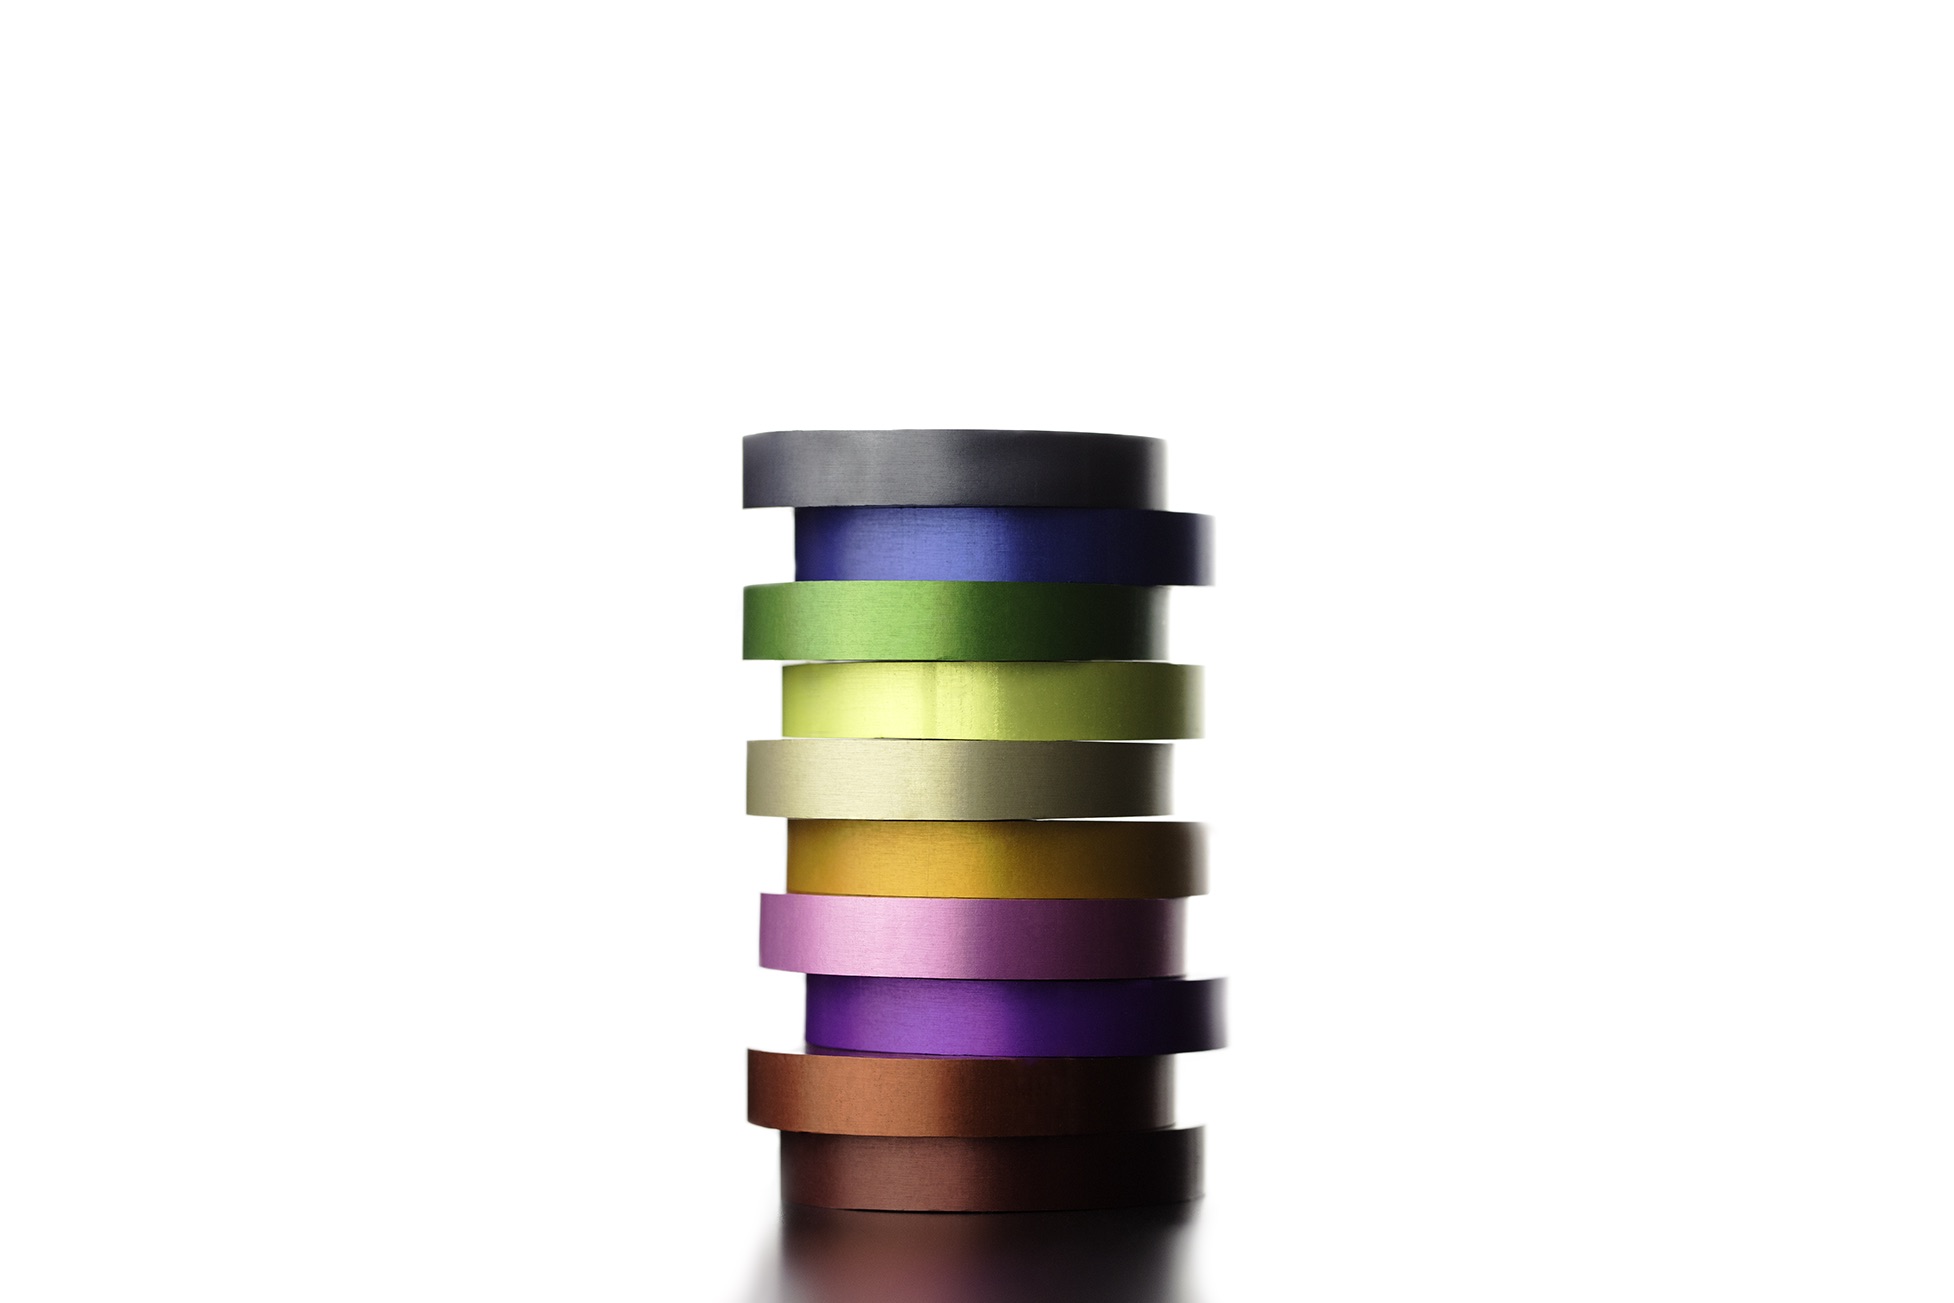
Anodizing is a process that converts the surface of a metal into an oxide layer through means of an electrolytic process. This natural oxide layer thickness is increased through this process to increase part durability, paint adhesion, component appearance, and corrosion resistance. The image below shows a few parts that have been anodized and then dyed different colors.
The process uses an acid bath and an electrical current to create this anodic layer on the base metal. In simple terms, we’re creating a controlled and durable oxide layer on our component, instead of relying on the thin oxide layer that will create itself. It’s similar to bluing, Parkerizing, passivating, and other surface treatments for steels that are used for corrosion resistance and surface hardening.
You may have caught onto the fact that rust is also an oxide, so why are we intentionally “rusting” metal parts? Well, oxide is not always bad as long as it is the controlled and, in the case of steels, correct composition.
Types of Anodizing
As I mentioned before, this article will reference MIL-A-8625 throughout to correlate with an industry specification. In this specification, there are three types and two classes of anodizing. The three types are as follows:
Type I
Type I and IB – Chromic Acid Anodizing
Type IC – Non-Chromic Acid Anodizing as a replacement to type I and IB
Type II
Type II – Conventional coating from a sulfuric acid bath
Type IIB – Non-chromate alternative for type I and IB coatings
Type III
Type III – Hard Anodize
Each type of anodize is used for a specific reason. Some of those reasons are:
- Type I, IB, and II are used for corrosion resistance and some degree of abrasion resistance. For applications that are fatigue critical, type I and IB are used because they are a thinner coating. One example of this is highly fatigued structural components on aircraft.
- Type IC and IIB are used when a non-chromate alternative is desired for I and IB. This is often the result of environmental regulations or requirements. When developing systems in the defense industry, new contracts often required environmentally friendly options (type IC and IIB) because of the presence of hexavalent chromium in type I and IB. However, it is possible to get waivers where required by geometry complexities and extensive re-qualification efforts.
- Type III is used primarily increased for abrasion and wear resistance. It’s a much thicker coating, so it will outperform the other types with respect to abrasion and wear. This coating may reduce fatigue life, however. Type III anodize is frequently used on firearm components, gears, valves, and many other components that will slide relative to each other.
All types may help the adhesion of paints and some other bonding agents compared with bare aluminum. In addition to the anodizing process, some parts may be dyed, sealed, or treated with other materials, such as dry film lubricant. If a part is to be dyed, it’s considered Class 2, whereas an undyed part is Class 1.
These factors, as well as others, will be touched on in more detail below.
5 Design Considerations
By now, you have probably gotten the hint that there are some key elements to consider when designing parts to be anodized. These are easy to overlook (and often are) in the design world. However, knowing and sharing this information will give you a leg up when working with anodized parts.
1. Dimensions
The first factor we need to consider is the dimensional change associated with anodizing components. On a drawing, an engineer or designer may specify that the dimensions apply after processing to compensate for this change, but with rapid prototypes, we rarely have a drawing, especially if we’re taking advantage of a quick-turn service that relies on solid models.
When a part is anodized, surfaces tend to “grow”. When I say “grow”, I mean that outer diameters will get larger, and holes will get smaller. This is because the anodic layer grows both inward and outward from the part surface as it builds up the aluminum oxide.
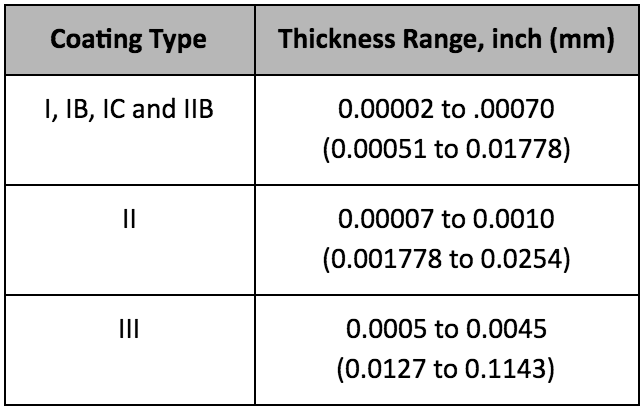
The dimensional growth can be estimated to be approximately 50% of the total thickness of the anodic layer. The table below details the thickness range of the different types of coatings, per MIL-A-8625.
These thicknesses will vary, depending on the specific alloy used and the process controls. If a designer is concerned about controlling the growth of a high-precision feature, it may need to be masked. In some cases, such as thick type III coatings, the parts can be lapped or honed to the final dimension, but this will add cost.
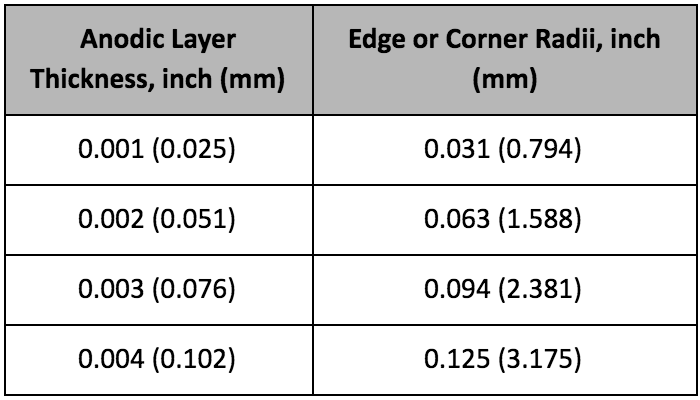
Another dimensional consideration is the radii of edges and inside corners because anodic coatings don’t form well on sharp corners. This is especially true for type III coatings, where MIL-A-8625 suggests the following corner radii for a given type III thickness:
With thinner coatings, an edge break in the range of .01-.02 may be sufficient, but it’s best to consult with the anodizing shop to verify this.
2. Wear Resistance
Given the increased hardness of the anodic layer, we know that the surface hardness goes up. It is not typical to actually specify the hardness of the coating because of the interaction between a softer base metal and a hard anodic layer. MIL-A-8625 specifies a test for abrasion resistance to accommodate these challenges.
As a frame of reference, however, 2024 aluminum base metal has a hardness in the range of 60-70 Rockwell B, where Type III anodize has a hardness of 60-70 Rockwell C. The image below is one of my CNC hold down clamps that has been anodized and dyed red.
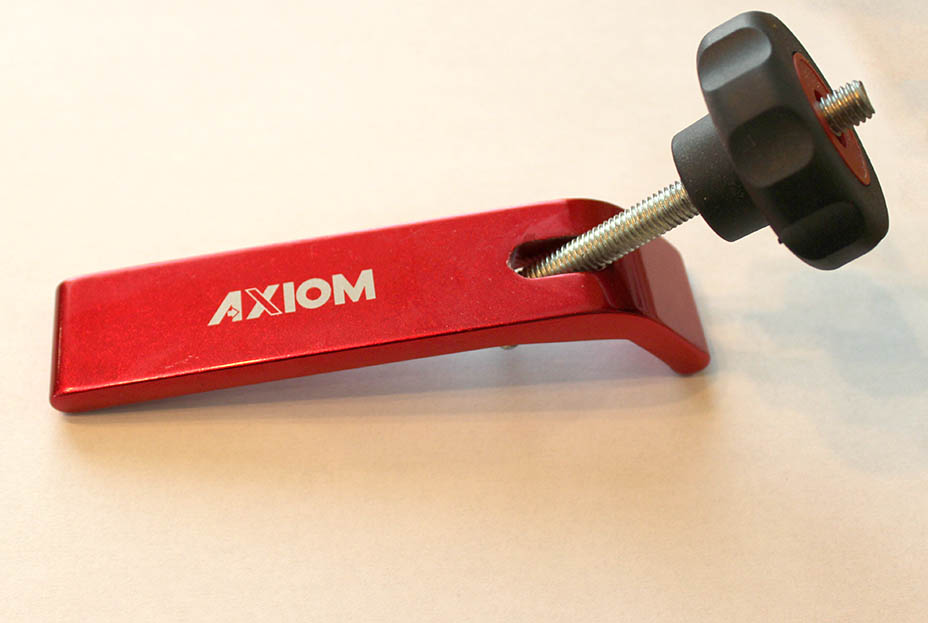
The surfaces show almost no wear, despite the tough application of holding down hardwoods, engineered plastics, and non-ferritic metals in a high vibration environment.
3. Adding Color with Dyes
As we can see above, anodized coatings can be dyed. This may be done for a variety of reasons, such as aesthetics, stray light reduction in optical systems, and part contrast/identification in assemblies.
When it comes to dying anodize, it’s also important to work through expectations with the shop that is going to anodize the parts. Some challenges to discuss with your suppliers are:
- Color Matching—it can be difficult to get a true color match with anodized parts, especially if they’re not all treated in the same batch. If an assembly is composed of multiple anodized pieces that are supposed to be the same color, special controls will need to be in place.
- Fading—anodized coatings that are exposed to UV and or heat may fade. Organic dyes will be more affected than inorganic dyes, but many colors require organic dyes.
- Dye Responsiveness—not all anodize types and coatings will take dye well. Type I anodize will have trouble reaching true black because of how thin the coating is. Often times the part will appear grey, despite the black dye, so colored dye may not be very practical without special processing. Type III hard coat may also appear dark grey or black on some alloys when the coating is on the higher end of thickness, and color choices will be limited. Some thinner type III coatings may accept multiple colors, but if aesthetics are the primary drive, type II is the best choice for color options.
These lists are not intended to be fully comprehensive, but they should give you a great start on making the parts you want the first time.
4. Conductivity
Anodic layers are good insulators, despite the base metal’s conductivity. For this reason, it may be necessary to apply a clear chemical conversion coating and mask certain areas if there is a need to ground to a chassis or component.
A common way to determine if an aluminum part is anodized is to test the conductivity of the surface with a digital multimeter. If the part is not anodized, it will likely be conductive and give a very low resistance.
5. Combined Coatings
Anodized parts can also have secondary process to either coat or treat the anodized surface for increased properties. Some common additions to the anodic coating are:
- Paint—anodic coatings may be painted to achieve specific colors that are not achievable through dyes, or to further increase the corrosion resistance.
- Teflon Impregnation—Type III hard coats can be impregnated by Teflon to reduce the coefficient of friction from that of bare anodize. This may be done in mold cavities, as well as sliding/contacting components.
There are other processes that can be applied to change the properties of anodic coatings, but they’re less common and will likely require a specialized vendor. If you have a special need, it’s best to reach out to a coating specialist.
Common Applications
Anodic coatings have a broad range of applications, as we’ve seen in this article. The most common is probably for aesthetics because of the ability to dye these components.
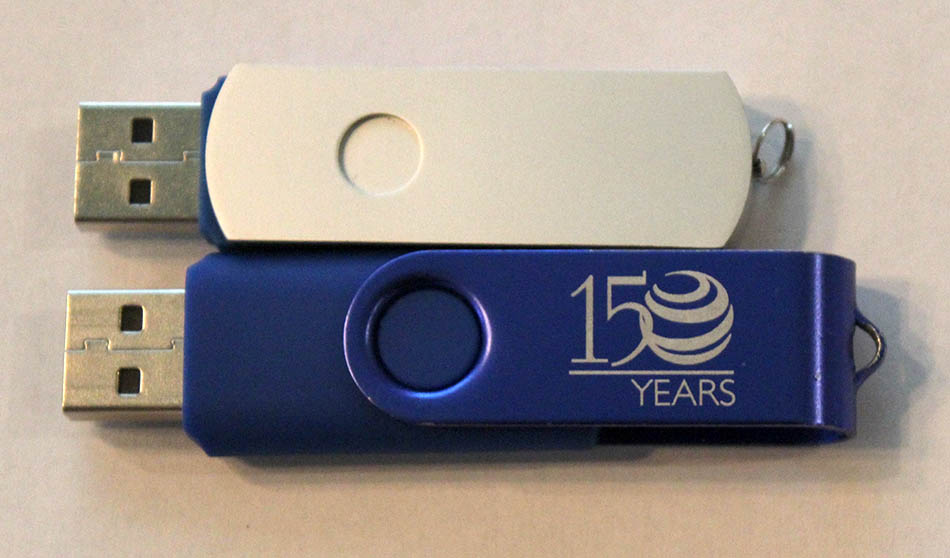
We can see that the top thumb drive is class 1 (undyed), so the anodic coating appears clean, and the color is almost that of the base alloy, while the bottom has been dyed blue. In another example, we can see a thread adapter that has been anodized and dyed black.
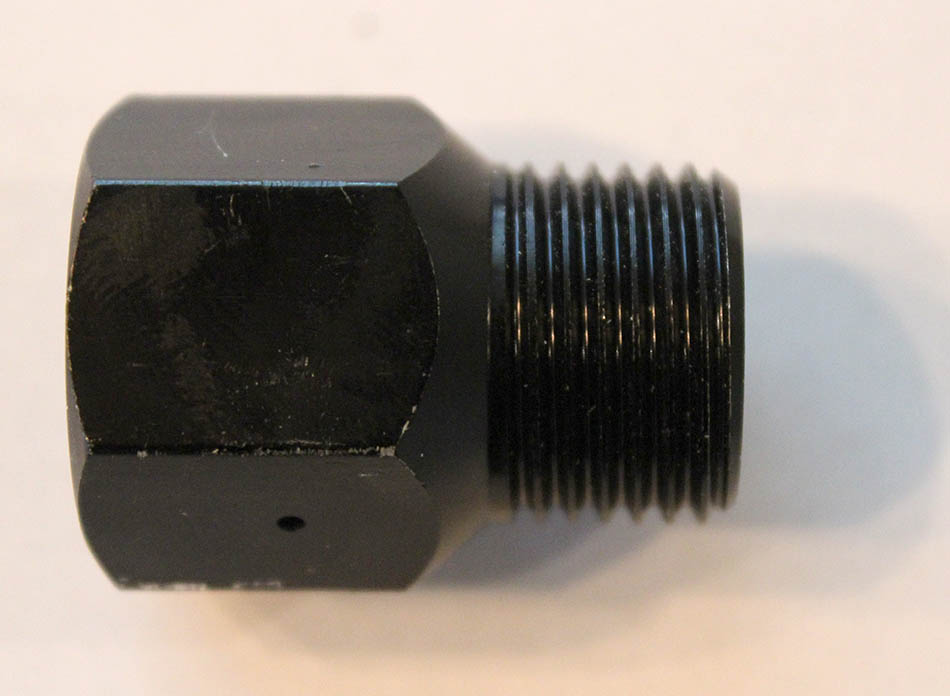
This coating hasn’t been nearly as wear-resistant as the hold-down clamps above, which indicates that it may be a thinner type II, or the process controls were poor. In the third example, we have some anodized heat sinks.
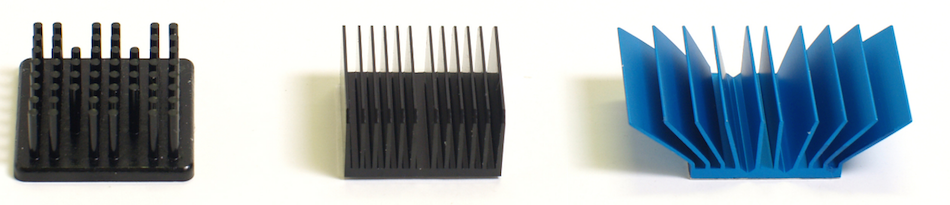
Anodic coatings can actually improve the effectiveness of a heat sink by increasing the surface emissivity an order of magnitude over bare aluminum, which improves the radiation heat transfer.
In the final example below, we can see a matte black valve that has a relatively high-quality anodic layer. To date, the part doesn’t show any signs of wear. Another interesting characteristic of the part below is the laser etching that allows the logo to contrast with the rest of the component. It is common to etch through the anodic layer, instead of printing on the surface of the part. This may be done to increase the durability of the logo, or to save cost and process steps.

While this is a broad range of examples, it still doesn’t come close to capturing the numerous applications for anodized parts. If you have an aluminum part and need any corrosion protection or aesthetic enhancements, I encourage you to look into the anodizing process.
Key Warnings
As with any process, there are some warnings that need to be discussed or recapped from the information above. This list is not fully comprehensive but will touch on the top considerations when designing parts for anodize.
- Thick anodic coatings may reduce the fatigue life of components, especially if they incorporate type III processes.
- Geometric changes need to be taken into account for any parts that will be anodized. This is critical for type II and III processes but may not be required for some type I.
- Color matching can be difficult when dealing with multiple batches and very difficult when working with different vendors.
- For full corrosion protection, it may be necessary to seal the pores of the anodic layer.
- The abrasion resistance of type III hard coats will likely drop as the thickness approaches and surpasses 0.003”.
- Different alloys may respond in different ways to the anodizing process. As an example, alloys that contain more than 2% copper content or greater are typically less wear-resistant when subject to MIL Spec testing of Type III coatings when compared to other alloys. That is to say, the type III hard coat on 2000 series aluminum and some 7000 series will not be as wear-resistant as 6061 with a hard coat. Consult your vendor to get their feedback if there are any concerns with the alloy you are using.
Main Takeaways
Anodizing is a great surface treatment option for corrosion and wear resistance, and the applications extend far beyond that. We can use anodizing to improve paint adhesion, provide a good surface for impregnation, and improve other surface qualities.
Furthermore, it’s a process that can expand into improved aesthetics. As long as the key factors mentioned in this article are adhered to, adding an anodize process to your components should be easy to implement.

