Time to read: 10 min
Remember National Geographic from 30 years ago? I spent hours poring through images of life at the extremes: expeditions in glacial caves, Amazon insects, Saharan dust storms, and underwater coral. But now, for my young nephew’s generation, pictures are too static, largely due to one innovation: GoPro.
A drop-proof, waterproof camera that everyone and their curmudgeonly uncle has and uses to capture the most mundane aspects of their vacations—and that semi-pros use to capture underwater video and crazy adventures—I’m really impressed with the robustness of the GoPro’s housing design and how foolproof the seals are.
Whether or not you’re making the next breakout electronics product, waterproof enclosures are used in all types of industry, from oil fields to iPhone cases, and we’re about to explore the necessary design aspects to make sure you never ruin your company’s four thousand-dollar prototype again.
One problem is that the term “waterproof” is subjective. Of course, when you’re designing a smart phone case to keep rainwater from ruining a $749 phone, your requirements are slightly different than when you’re designing an electronics housing for monitoring deep sea drilling equipment. But how “waterproof” is enough?
We’re not the first people to ask that question. Waterproof enclosures have been a necessity for years, and there are a lot of great, proven design elements we can explore, so your design comes out right from the first prototype. Let’s dive in, so to speak.
The International Protection (IP) Marking System
Also called the “Ingress Protection” marking system, this system of evaluating electronics housings gives real meaning to the term “waterproof,” by giving real tests that must be passed at different levels. The system has two unrelated numbers following the IP: The first number indicates the level of dustproof-ness, while the second indicates how waterproof an enclosure is.
If you want to only indicate the level of waterproofness, an “x” can be used in place of the first number, to indicate just the second (example: IPx7 means we know how waterproof it is, but have no idea, and may not really care, about the dust). The most common markings you’ll see on cases and housings are IP67 and IP68, but all of them are worth exploring.
The IP6x means that it’s dustproof and that no particles of dust can get inside. While that can be important, most industrial and consumer uses will be more concerned about the waterproof rating. Dustproof is certainly not a given with waterproof design, but once seals protect against spraying water, most people will assume they protect against dust.

For most applications, the lowest rating considered “water resistant” is IPx4. This describes many older watches and means that the interior parts will keep working after a splash of water, but any more water will be an issue.
IPx5 is decent step up—if you spray your housing with water from any angle, the interior parts keep working—but at this level, the spray is light (just over 4 psi and relatively low flow). Still, this is a good level for a “rain-proof” housing, and a lot of phone housings come from the factory with this as a basic level of sufficiency.
At IPx6, the tests get interesting; you have to spray your housing for several minutes with a 100-liter-per-minute jet at 15 psi. Most consumer electronics can’t handle this, and if they can, the designers are bragging about their “IP Rated” product.

The next level requires immersion: letting the housing sit in a meter of water for 30 minutes. It’s a test that knots your stomach. If this test goes wrong, it goes really wrong, and you end up with scrap electrical parts.
One odd note: Just because your housing can withstand the static pressure of water at one meter depth doesn’t mean that it can withstand the water jet test from IPx6, so test both, if the design will need to resist forceful spray.
And here we return to GoPro’s impressive housing. An IPx8 rating means that your housing will be able to withstand long-term immersion in water of some specified depth—for GoPro, that’s a depth of 60 meters. At that depth, the housings are guaranteed to stay sealed at a pressure of 87 psi—incredible!
Anything higher than this level gets into esoteric specialty designs, but even at this level, it’s not difficult to imagine the standard sealing mechanisms failing. So, now that you know what the levels are, how do you create a seal that will withstand those tests?
Designing Seals That Actually Seal
Though there are nearly an infinite number of different types of seals, three of the most common are face gaskets, static o-ring seals, and dynamic o-ring seals. I’ll cover each of these briefly, but if you want to really dig into the depths of o-ring design, the Parker O-ring Handbook is one of the best—and most boring!—reads on the subject. But one of the great things about o-rings is that they’re a well-known technology—the recommendations haven’t changed in 50 years—so they’re sure to keep your design waterproof.
Static O-ring Seals
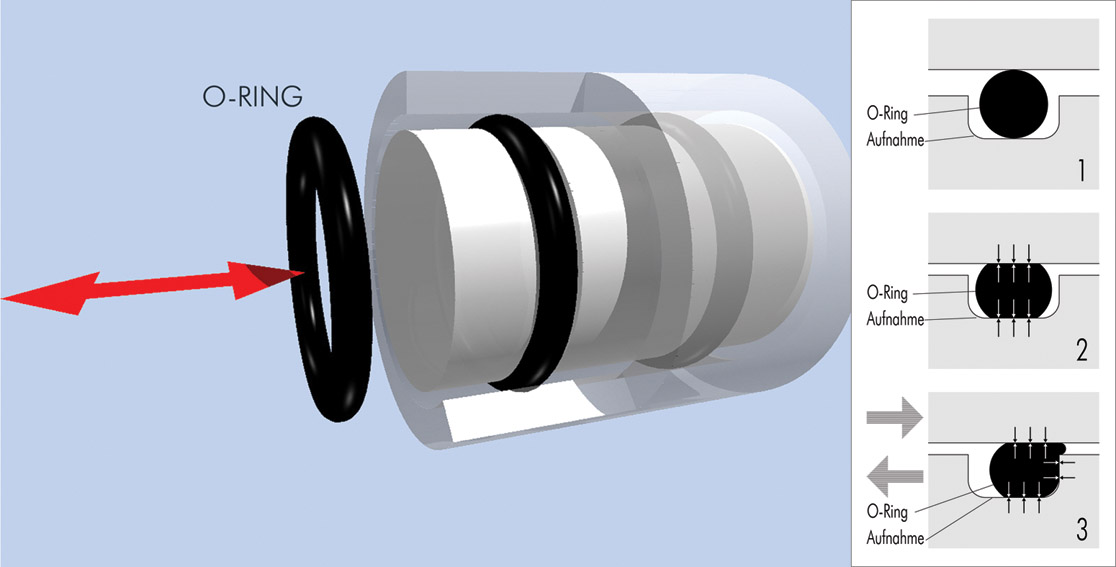
These represent a sort of ideal scenario: The connection you’re trying to seal is more or less round (and definitely convex), and the two mating parts are going to stay together forever (unlike Brad and Angelina, but some things just happen), or at least most of the time. Static o-rings are a good place to begin.
O-rings come in a wide variety of sizes, denoted by the “dash” number. No, o-rings aren’t sprinters—the dash number is an ASTM designation that indicates a standard size (chart here). Generally, the larger the last two numbers the larger o-ring I.D. (inside diameter), while a larger first number indicates a larger cross-section diameter.

When using an o-ring as part of your seal design, you’ll need to design a groove where the o-ring can sit. The great thing is that the groove design remains essentially the same, whether you’re sealing two faces, a screw thread, or even a square peg in a round hole (well, the first two are true). For the design, you’ll only need to think about the ID/IP (internal diameter for round seals; internal perimeter for non-round seal shapes), the percent stretch of the o-ring, the cross sectional diameter (also called o-ring width), and the percent squeeze.
The first step: look at the I.D. of the seal, or calculate the I.P., if your shape isn’t round. In the case of the GoPro case, this would be the sum of the four straight sides, plus the length of the four chords from the corner radii. Add these together, and you have the magic number.
Just remember you’re looking for the internal perimeter, so this is the inside of the groove—this process can be iterative, so you may end up calculating this a few times with different cross-section diameters.
Once you have the ID/IP, look at the ASTM charts to look for your o-ring options with a similar ID—but smaller. This is where the percentage stretch comes in, and for a static seal, you’ll want the o-ring ID to be about 1-5% smaller than the groove ID. This gives the o-ring a tight fit against the sealing surface and keeps it from moving too much with external pressure. Please note: If you’re designing for internal pressure, you’ll want to consider the outside diameter instead—that’s the sealing surface. (Also note: You’re reading the wrong article. Go!)

The width of the groove is based on the cross-sectional diameter of your o-ring, which is based on the estimated variation of the surfaces you’re sealing against. Obviously, if you plan on allowing a tolerance of +/- 0.010” on the surfaces that are sealing, an o-ring of 0.010” is going to have trouble sealing some of those gaps. Likewise, if you have high-tolerance machined parts, getting a ¼” thick o-ring will be overkill. (You’re an engineer—engineer it! Earn your pay!)
Once you’ve determined the o-ring width, though, you can calculate the width of the groove. This is based on the o-ring volume, and is calculated using the cross-sectional areas of the groove and o-ring. In order to create a seal, you’ll need to compress the o-ring, and you need to plan on 10%-40% compression (also called the squeeze) of the o-ring, and make sure that the maximum cross-sectional area of the o-ring (including variations from tolerance) is always smaller than the minimum cross-sectional area of the groove.
Tired of running numbers and, you know, engineering? Good news—we’re almost done, and you’ll be able to seal this housing tighter than the X Files.

Dynamic O-ring Seal
Obviously, having a dynamic seal doesn’t mean you can open a housing underwater. However, many times parts need to move while exposed to rain, or under the sea. So, how do you ensure the container stays waterproof?
Great news: it’s just like the static seal, but with less compression and more lubrication. All the rules and percentages apply, except that for a dynamic seal you’ll need only 10%-30% compression.
Gasket Design
This could be an article by itself. Or a book. Or even a small library. But today, we’ll only look at waterproof gaskets—so we can throw out everything needed for internal combustion engines and extreme high-pressure seals.
Even here there is a lot of material, but we’ll narrow all that down in a moment; let me say this first: As awesome as o-rings are, why are you going with a gasket? Now that I’ve got that out of my system, I can admit, gaskets excel in one area: really complex face-to-face seals, especially with multiple cavities.
Again, as with o-rings, you’ll need to consider the compression needed for your application and the thickness, based (generally) on the tolerances of the two mating faces. The great thing about gasket design, though, is that gaskets are generally custom, so no iteratively running calculations on standard sizes you look up on a table. Yay for bespoke designs!

With the options, though, comes responsibility. When bolted together, the surfaces will warp between bolts, so consider how to space the mounting hardware to keep the warp sufficiently minimal to still seal with the thickness of gasket you specify. What?
Basically, if you bolt two parts together on the four corners, the center area will be further apart than the corners. If that gap is greater than the thickness of your gasket, your housing will leak. Likewise, if the gasket is too hard and doesn’t allow for the roughness of the two surface, your housing will leak—so have gasket material soft enough to allow for some machining marks, unless you specify a smooth surface.
A Note on Compression Set
One of the consistent problems faced in using rubber seals is creep (not Radiohead, and not the kid in your class that kept staring at you, but elastomers that tend to take on the shape of the surfaces around them, losing their original shape). The primary solution for this is careful material selection—many of the rubber-like materials developed since the beginning of the Space Age have been focused on this issue.
Another consideration here is the hardness of the material. Both of these issues are related to finding the right material, and I recommend researching this heavily before selection, using MatWeb and the Parker website as guides to materials.
Buttons
For most consumer applications and many industrial ones, the electronics will have some sort of interface that will need to allow for, well, interfacing. Buttons are the most common way to do this, though I have seen some great designs using IR activation, which was way cool, but if I told you the application, I’d be in violation of confidentiality agreements (It’s all very 007). Anyway…buttons.
For low-pressure applications, one easy option is a molded rubber button that seals to the housing. These are cheap and easy, and more details can be found in this article on general button design.

Another option is having a button of a hard material, like stainless steel, which passes through the housing using a dynamic o-ring seal. This kind of button is typically seen in heavy-duty applications like undersea housings, where high pressure could activate the soft rubber buttons, or places where tough chemical compounds make a rubberized button likely to fail.
Similarly, the design of nearly any type of switch, from slide switches to knobs, can be designed into the housing, using the calculations for a dynamic o-ring seal. But remember: the more seals, the more seals that can fail. Use with caution.
Prototype Recommendations
When beginning the design of the housing, lower resolution materials are great for getting the fit, function, and aesthetics right, before you test the actual waterproof capabilities of the design. 3D printed PLA is a great first pass to see the enclosure look, and materials like 3D printed ABS and Nylon can test part interfaces. And if you do decide to go with custom gaskets, try out the fit with a printed rubber-like first prototype.

However, don’t put the electronics in one of these housings and throw it in the swimming pool—you’ll need to use high-resolution materials to get a seal against o-rings or gaskets, and for that, you need a material like VeroWhite/VeroBlack, ABS, or VisiClear. These materials print with high accuracy, so you can get a good quality seal.
For very high pressure seals, you’ll need to take one step further and go with a CNC machined prototype to ensure control over surface quality, before testing the design in deep water. Traditionally a very expensive and lengthy process, the good news is that Fictiv has recently expanded its manufacturing capabilities, keeping costs down, while still giving you the high quality you’ll need for these types of tests. Check out the China Manufacturing parts Capabilities Guide for more details.
Main Takeaways
Whether your next design project is going to be experiencing the extremes of a mission to Mars (a link to SpaceX, because we all love Elon Musk), or just required to keep the electronics safe during a light rainstorm (or from a cup of coffee), it’s a simple matter of planning your interfaces, checking a few numbers to determine the size of your o-rings, and choosing the right button styles for your project. Then you, your teammates, and most importantly, your boss, can rest easy, knowing your enclosure is fully waterproof.

