Time to read: 8 min
Say you’re 3D printing a robot, and you’re designing a sweet gearing system to make your robot move smoothly. You can choose to 3D print or CNC machine involute gears for simple and reliable incorporation in your robot design. What to do about the fact that most CAD programs don’t have a “create involute gears” button? Welp, you’ll have to create these geometries manually. Check out this article for a refresher on involute gear geometry and nomenclature. As a quick refresher, an involute is a curve which is formed when a point on a cord is unwound from a circle, meaning an involute is a form of spiral which becomes straighter as it is drawn from the circle and eventually becomes a straight line. The smaller the circle it is drawn from, the more curved the involute is. Involute gears are so popular because both gears will rotate at a consistent speed while the teeth are engaged, resulting in a smaller chance of vibration, noise, and wear during use.
In this tutorial, I’ll walk you through the process in SolidWorks (2017 version used for this tutorial), and you can use a similar system for any other program, such as creating an involute gear in AutoCad.
More specifically, this tutorial will cover:
- How to draw an involute gear tooth profile
- How to draw gear teeth individually
- Basics of involute tooth profile and involute gear design
- Calculating involute gear geometry
Designing and drawing involute gears in a CAD program is tricky, but if you follow the steps below, the teeth will come out right every time. Go slowly and make sure that you follow each step carefully, and soon you’ll have a great gear ready for print!
Step 1
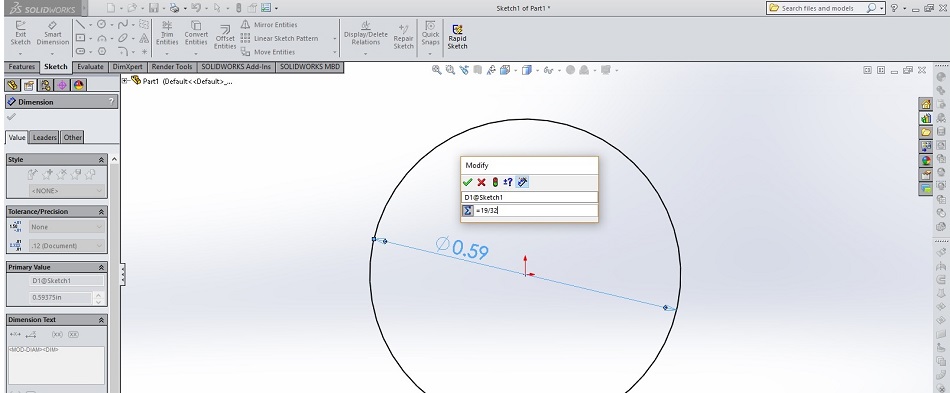
Calculating involute gear tooth geometry starts with understanding the number of tooth per gear and the pitch of the teeth. For our example, we want to create a 19-tooth 32-pitch gear. We know that the pitch diameter of the gear will be 19/32 inches, which equals 0.59375 inches, but because we can keep equations in CAD, we’ll just create our first circle with a diameter of “=19/32”, as shown in the picture below. (I recommend using the top plane for all these sketches.)
Here is a quick refresher on calculating involute gear geometrical relationships:


So, if we want this gear to mate with an adjacent involute gear but want the adjacent gear to have a doubled diameter of 1632 inches or 1.1875, the adjacent gear will need the following number of teeth:

Step 2
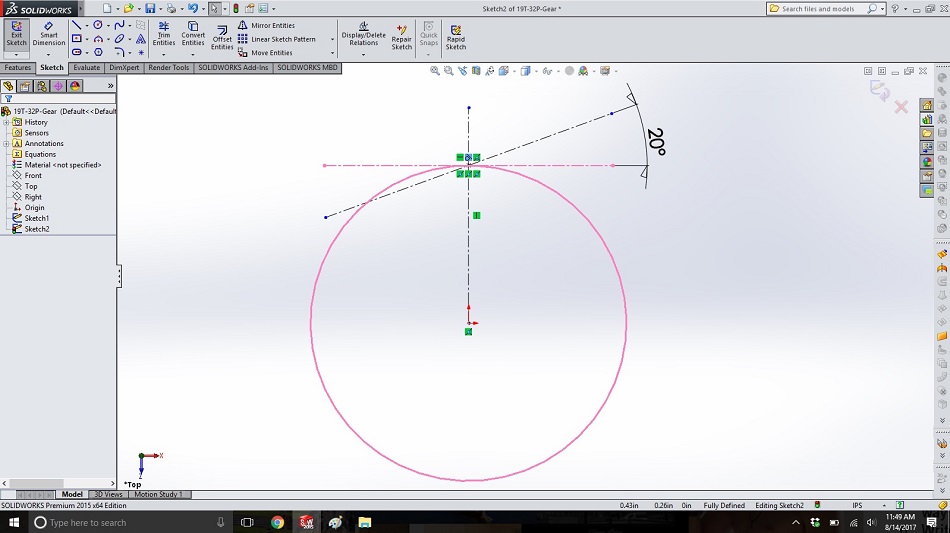
We want to create the edge of the tooth as if it were a point on the imaginary string unwinding from our post. This is the first step in designing the involute gear tooth profile. To do this, in a new sketch on the same plane, we first create a horizontal line at the top of the circle, and then create a line with the pressure angle (20 degrees, since that’s common) which passes through the top of the circle, so we end up with a sketch that looks like the one below.
Step 3
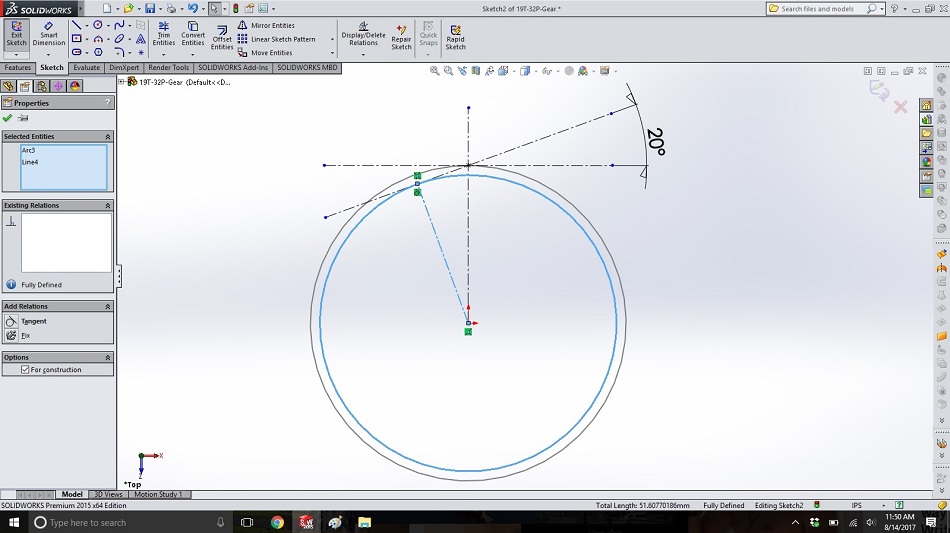
In the same sketch, create a circle inside the first (concentric) that is tangential to the 20-degree (pressure angle) line, and then make another line from the center of the circles to the intersection of the pressure angle line and the inner circle. (Both circle and line are highlighted in blue below. The circle from this step becomes the “base circle”: The imaginary post around which the string is wound.)
Step 4
In this step, we’ll finally create the “string” for the involute gear geometry, imagining the edge of the tooth to be this string unwinding. In another new sketch on the same plane, create a line along the pressure angle line from the base circle to the pitch circle, as shown below, and dimension it with a driven dimension. (The actual length of this is determined from the pitch and number of teeth of your gear, so it must be a driven dimension, but we’ll need the dimension on there to use in equations in the next steps.)
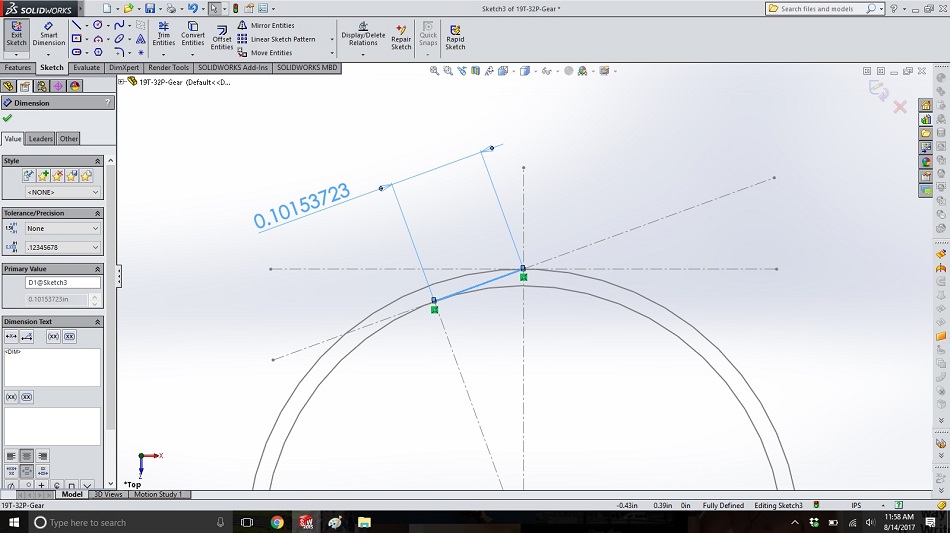
Step 5
Now, we’ll imagine the string unwinding from our base circle and see the curve a point on the string would make. This will be an approximation but will be close enough for a printed gear, and you can make the approximation more accurate by choosing smaller increments for your approximated points.
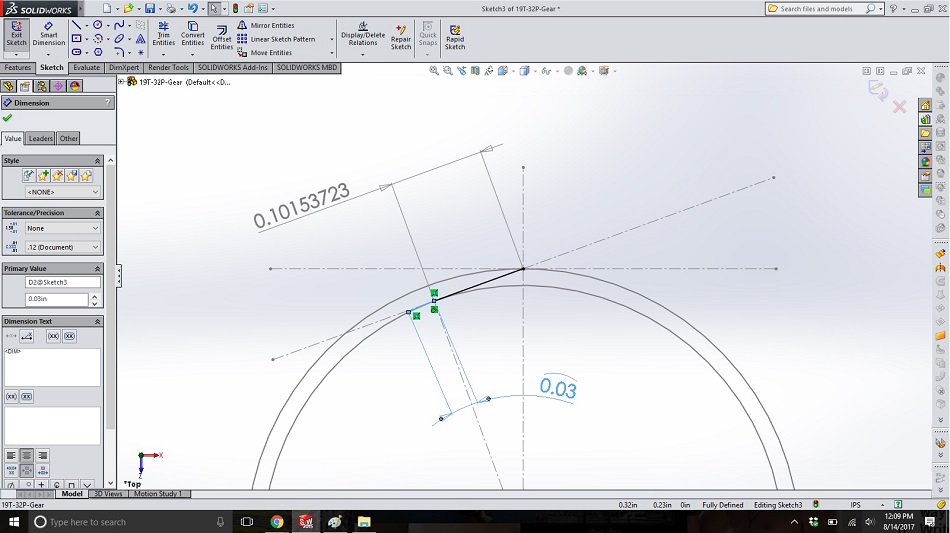
Draw an arc that goes from the point where the “string” contacts the base circle to a little to the left, cordial with the base circle. Dimension this arc with an arc dimension (select both the end points and then the arc itself, otherwise you’ll end up with a chord dimension, which just measures the straight-line distance between the arc endpoints) and give it the length of the increment you want for approximating the involute curve. (I recommend using a length about the pitch or module, in this case 0.03, though remember that smaller increments create more accuracy, and larger increments are fine for rougher approximations.)
Step 6
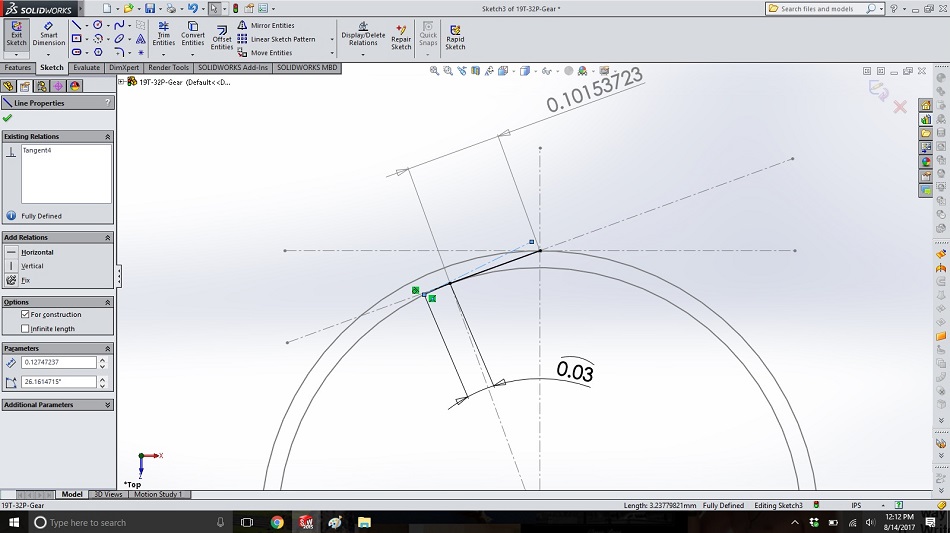
Draw a construction line from the left end of the new arc towards the right and make the line tangential to the base circle (also tangential to the arc). We’ll call this line the “string plus one” line.
Step 7
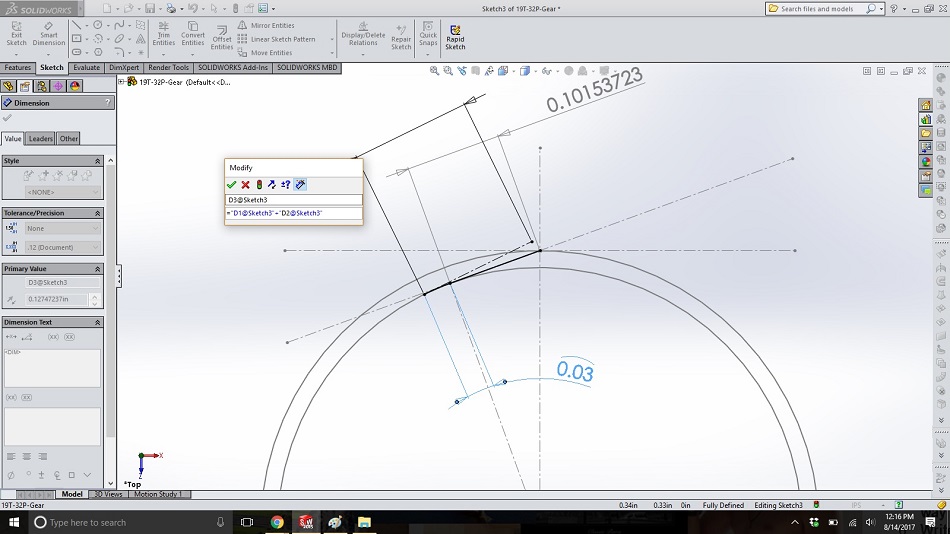
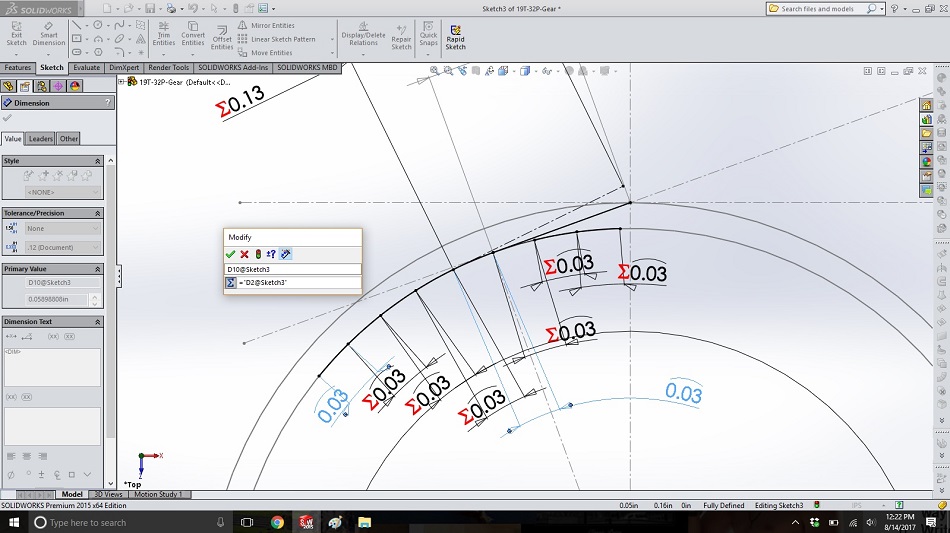
Dimension this new line. In the dimension box that pops up (not the area on the left), type “=”; click on the dimension for the first straight piece of string (in this case 0.10153723); type “+”; and click on the dimension for the arc.
The resulting box should look like the one below; click on the green check mark to accept. (The reason for this is that the arc represents the string unwinding from the cylinder, and so the end of the string gets longer by that amount as it unwinds to this new location.)
Step 8
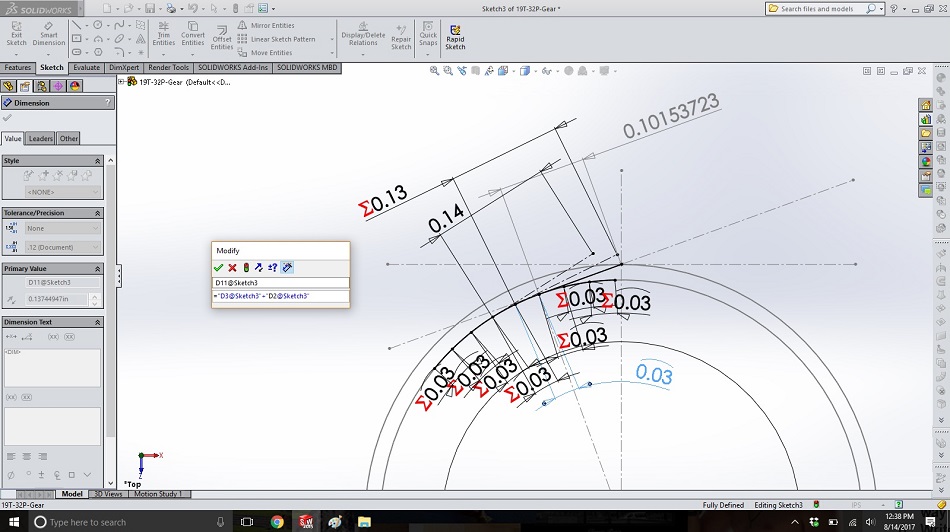
Create several more arcs on either side of our current arc, each with the same arc length as the first. To do this quickly, draw the arcs; dimension the arcs (selecting each end and then the arc itself); type “=” in the pop-up box; and click on the dimension of the first arc.
Step 9
From the next arc to the left, create another construction line tangent to the base circle. This represents the string unwinding just a little more, so it should be the length of the “string plus one” line from steps 6 and 7, plus the length of the arc.
Dimension it by clicking on the line, typing “=” in the box that pops up, clicking on the dimension for the “string plus one” line, typing “+”, and clicking on the dimension for the arc. This line will be called the “string plus two” line.

Step 10
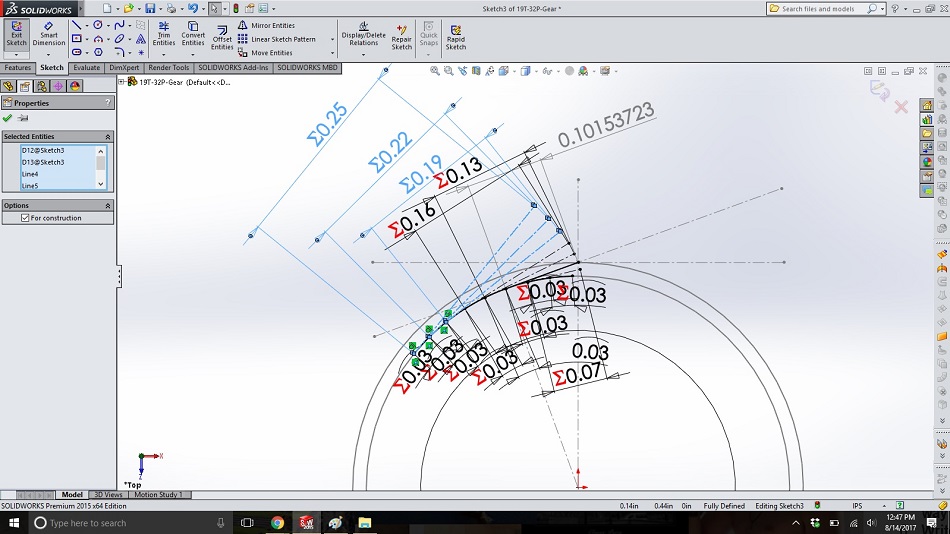
Repeat step 9 for three new unwinding strings to the left. Each of these lines should be the length of the next string to its right, plus the arc length between them. Because these represent the string unwinding, this makes sense with the image of the string around a cylinder.
Step 11
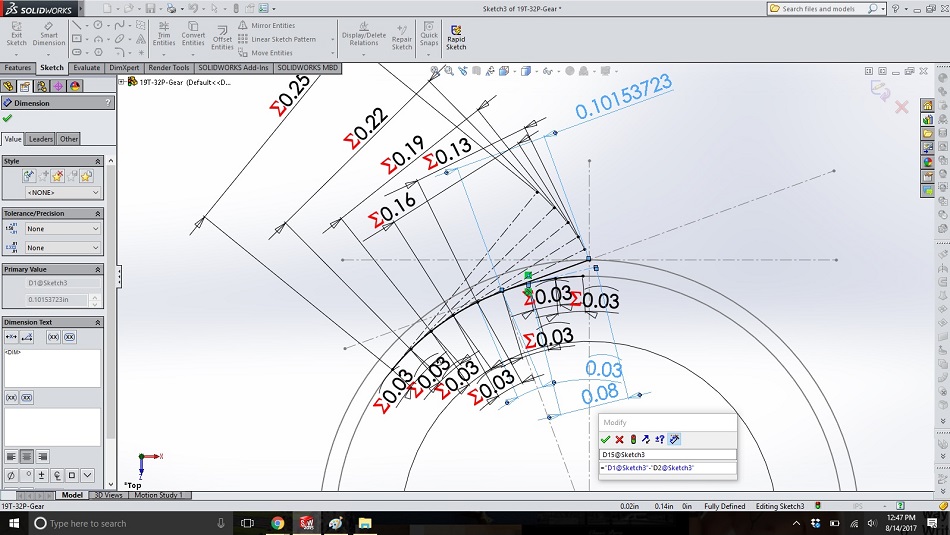
Now we need to create the lines for the string winding from the original location onto the cylinder till it ends. From the next arc to the right of the original line, create a construction line tangential to the base circle. Because the string is winding more tightly, the length of this line needs to be the original string line minus the length of the arc between them. Click on the line’ type “=”; click on the dimension for the string line; type “-”; and click on the dimension of the arc.
Step 12
Repeat step 11 for the two additional arcs to the right of the original. If you are using about the diametric pitch for the arc length, then three arcs to the right will bring the end of the “string” almost in contact with the base circle; our imaginary string has been completely wound around the cylinder.
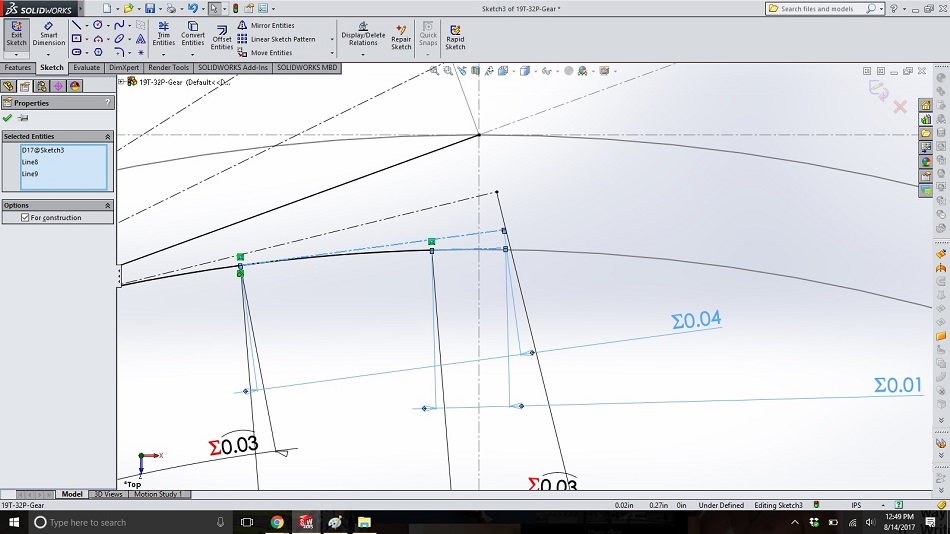
Step 13
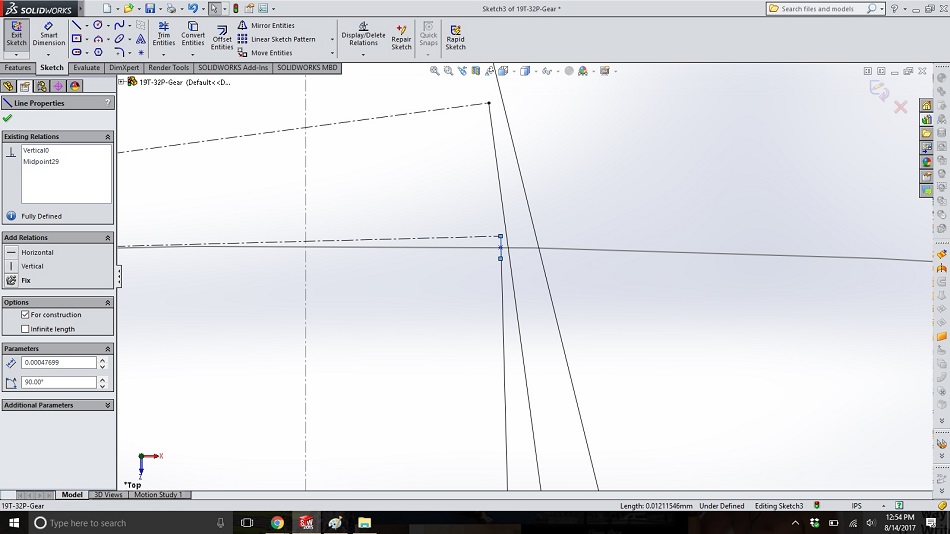
Zoom into the tail of the last “string” and draw a small, vertical midpoint line from the end of the string, with the midpoint on the base circle, so that there is now a point inside the base circle directly below the end of the string. Because we can’t wind the string into the cylinder, the second point of this line gives us a point inside the base circle for finishing our gear tooth.
Step 14
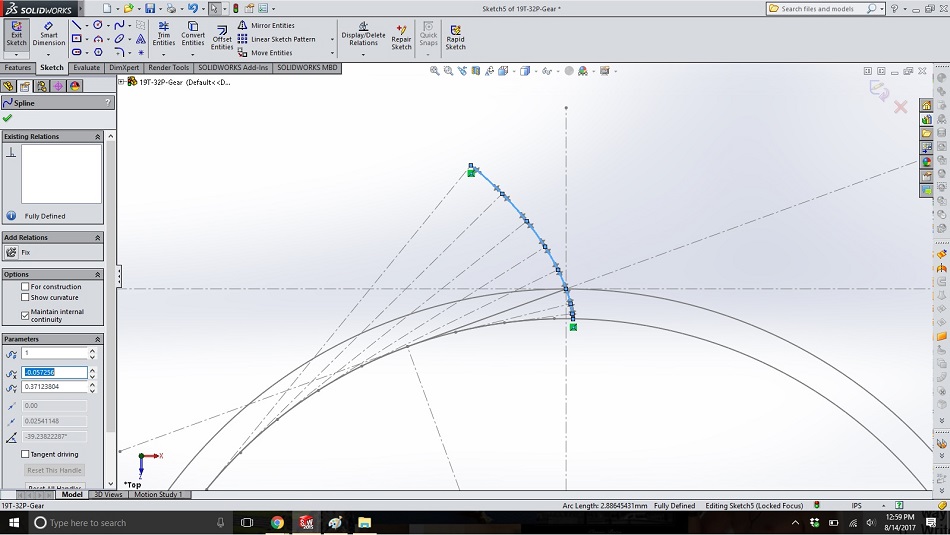
Open a new sketch on the same plane and draw the involute spline through the points from the uppermost (where the string is most unwound) to the lower right (where the string is tightly wound), plus the point inside the base circle created in step 13. You now have one side of the tooth drawn.
Step 15
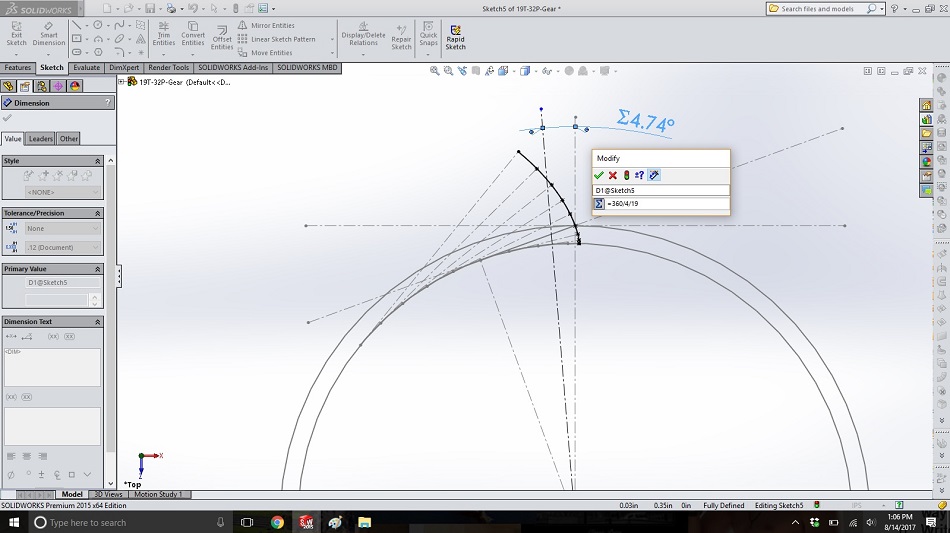
Draw a construction line to represent the centerline of the tooth. For a 19-tooth gear, there are 19 teeth poking out and 19 spaces between the teeth, so we need the centerline of the tooth to be the whole circle (360 degrees) divided by 2 (the tooth and valley) divided by 2 (half the tooth) divided by 19 (the number of teeth). Dimension the angle as “=360/4/19”.
Step 16
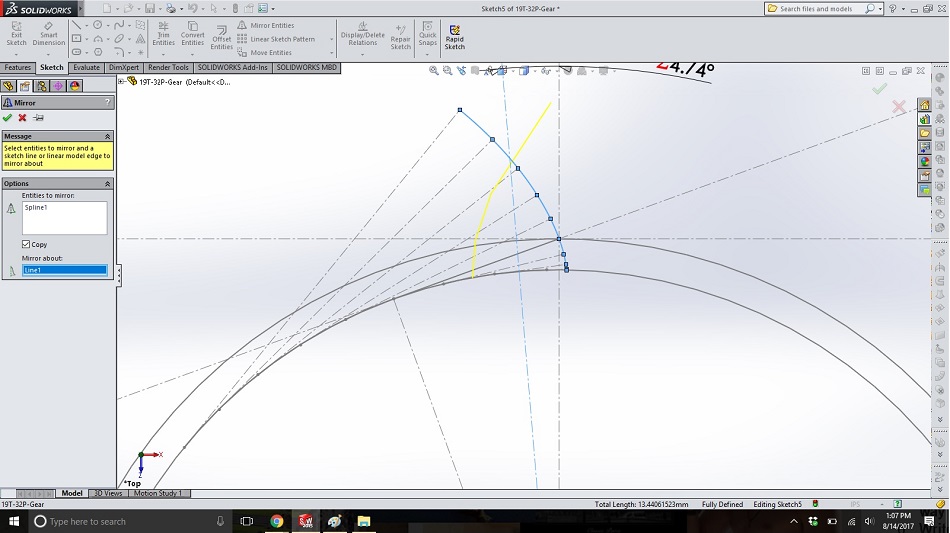
Mirror the spline about the tooth centerline.
Step 17
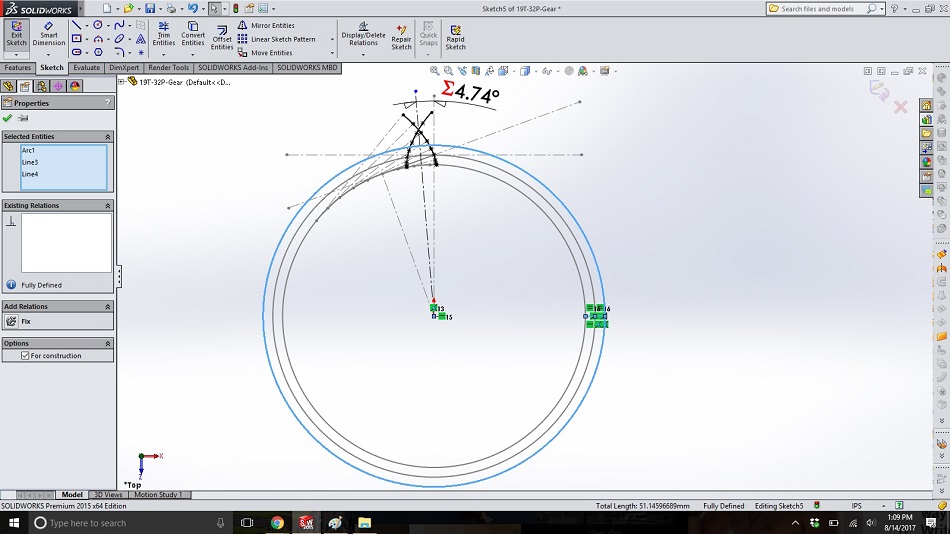
To define the outside of the gear, create a circle around the pitch circle. Draw a radial line from base circle on the right-hand side to the pitch circle and another from the pitch circle to the new circle (the outside). Make these two lines equal lengths, so the outside circle is the same radial length larger than the pitch circle as the base circle is smaller.
Step 18
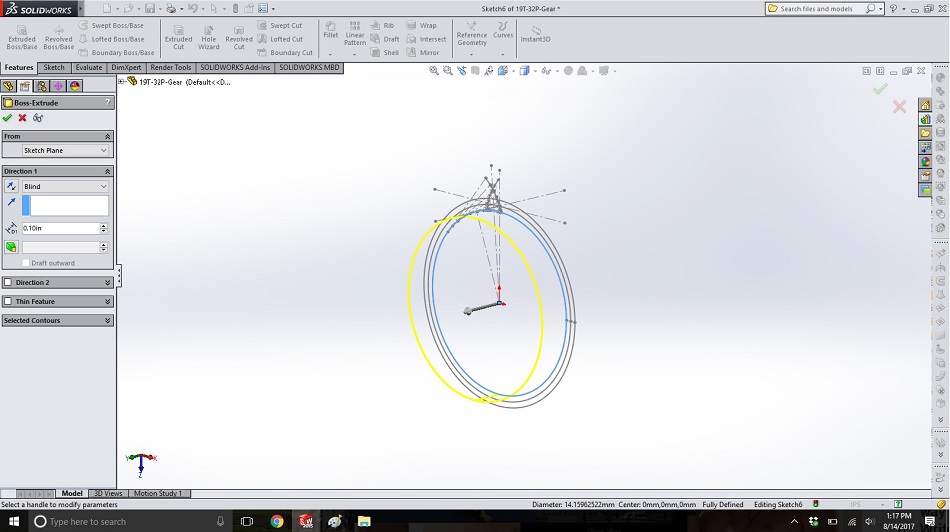
Now we have all the lines that will define our gear. In another new sketch on the same plane, draw a concentric circle with extends to the inside end of the spline (just barely smaller than the base circle, allowing a small amount of clearance). Extrude this circle to the desired gear thickness.
Step 19
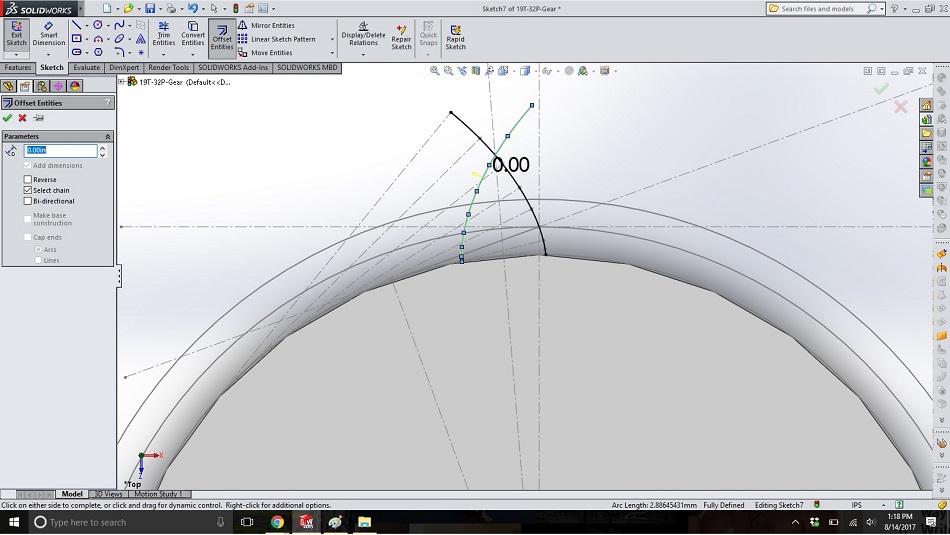
In a new sketch on the same plane, use “offset entities” and a dimension of “0.00” to copy the right-hand spline into the new sketch. Repeat for the left-hand spline.
Step 20
In the same sketch as above, use “offset entities” and a dimension of “0.00” to copy the circle from step 18. Then repeat for the outermost circle from step 17.
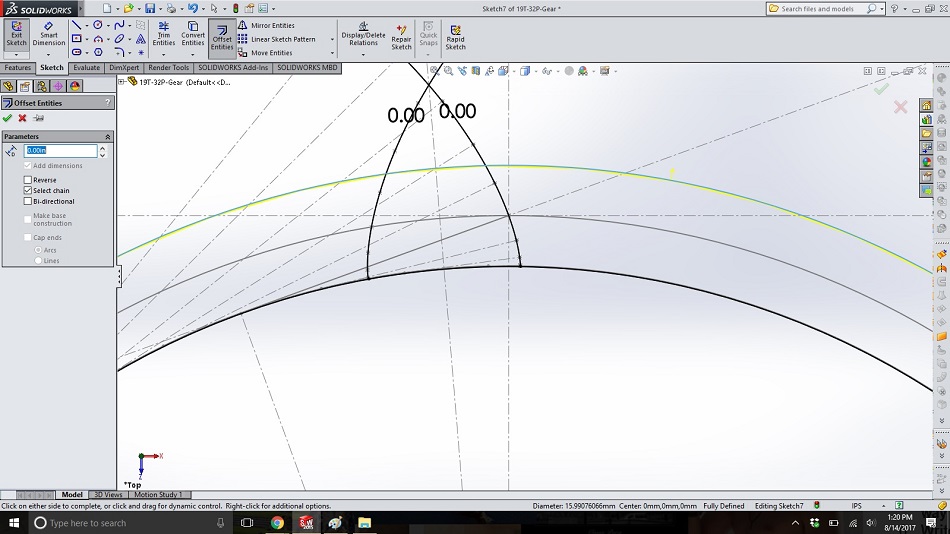
Step 21
In the same sketch, use “trim entities” -> “power trim” to cut off the parts of the spline which extend beyond the outside circle. (If you hide the body from step 18 and all the other sketches, the tooth will become visible.)
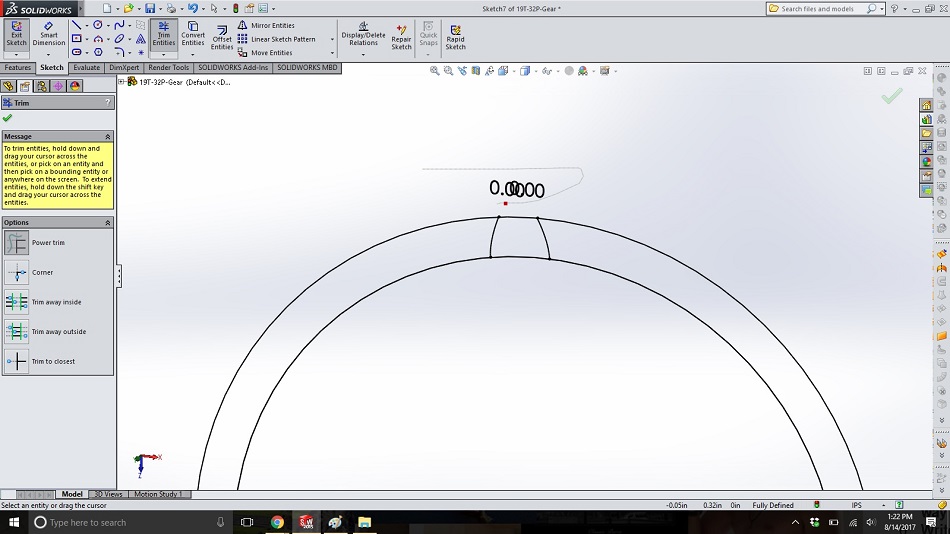
Step 22
Extrude the sketch above to the same length as the circle from step 18. Click in the “selected contours” box of the extrude dialogue, and then click inside the tooth area to highlight the tooth region.
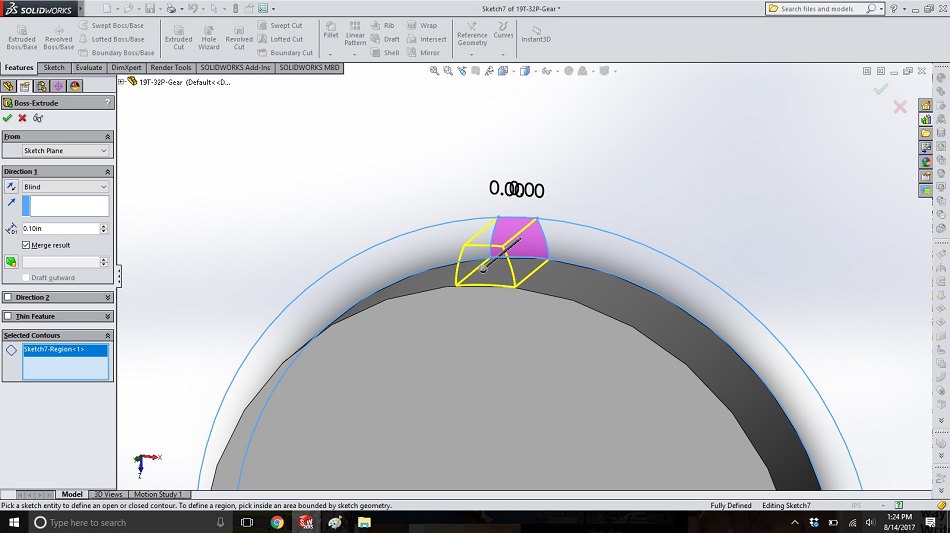
Step 23
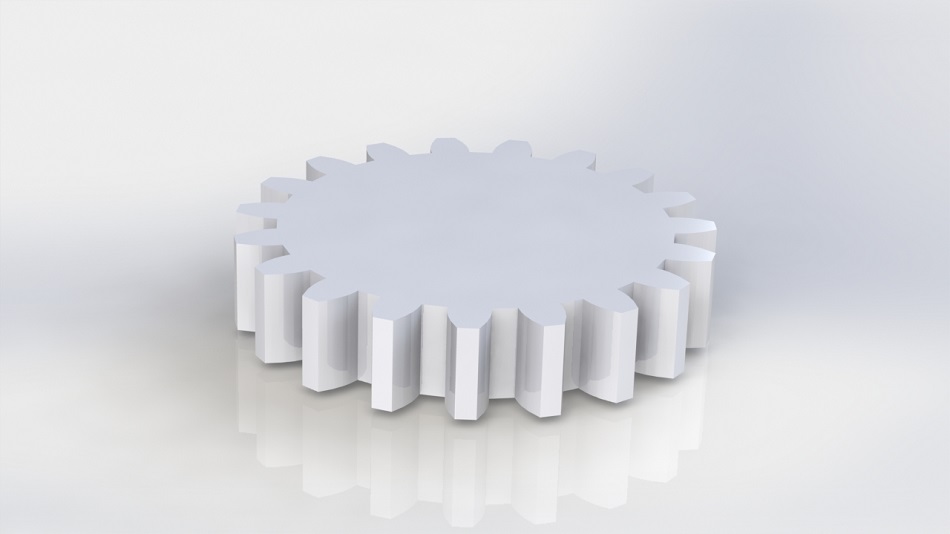
Click on “linear pattern” -> “circular pattern” to bring up the circular pattern dialogue box. For the rotation, click on the outside of the extruded circle from step 18. Type in “19” for the number of instances and select “equal spacing”, and then click on the tooth for the “features and faces” pattern.
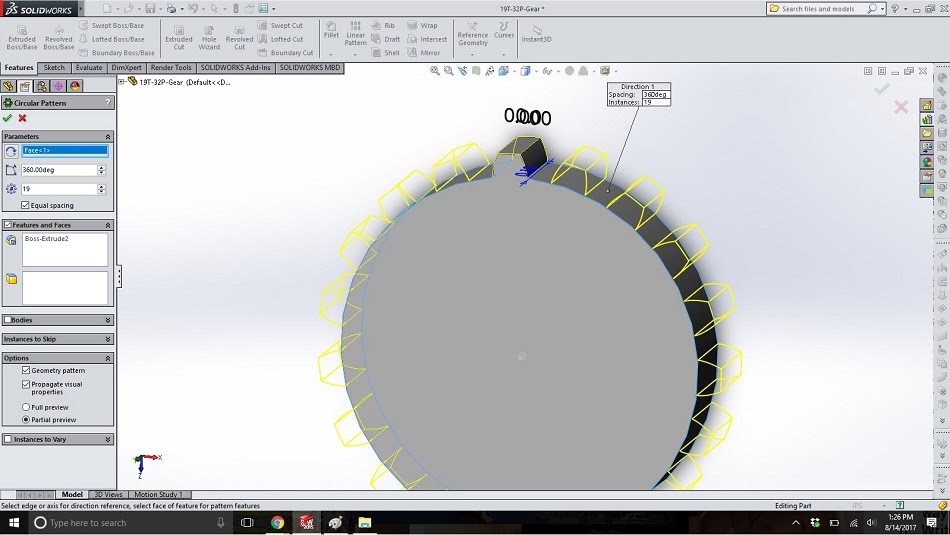
Congratulations; you have a gear!
Special thanks to Steen Winther for developing the core of the method on which this tutorial is based.
For all your manufacturing and mechanical design needs, including involute gears, reach out to China Manufacturing parts, Inc. today. China Manufacturing parts is the ultimate manufacturing partner, providing an intelligent platform to upload your 3D models or 2D drawings for an instant quote and DfM feedback. We are experts in CNC Machining, Injection Molding, Urethane Casting, and 3D Printing. If you’re ready to start uploading your 3D printing design files, you can visit China Manufacturing parts for an online quote in minutes.
