Time to read: 6 min
Go, Go, Go—we’ve all heard the inspirational and aspirational desire of upper management to get it done, get it done right, and as always, get it done faster. One way to be more efficient as an engineer is to learn to code. In this blog post, I hope to help convince you to start coding in your mechanical engineering practice. At the end, I’ll show you how to set up two of my favorite Macros inside of Solidworks to help you make parts faster.
Coding Can Maximize Your Engineering Time
There is only so much time in a day, and you, as an engineer, only have so many focused clicks before your mind starts to wander. My mind usually wanders from, “I want to go outside,” to tacos, to margaritas, to “What time is it? It’s five o’clock somewhere…” as I start to wiggle in my seat (Thanks, Jimmy). So, the real goal for you to be successful is to concentrate where your clicks are used.
For mechanicals, you want to concentrate on clicking inside your wheelhouse engineering applications (CAD, FEA packages, MATLAB simulations, thumbing through engineering texts, data sheets). Why? Well, because that’s what is truly your job. Also, since you’re unlikely to get an admin anytime soon, you need to figure out a way to speed yourself up by becoming more efficient.
A good senior mechanical engineer should be able to output 75-100 parts a year—all at different varying complexity, of course, but that’s a good target. So, if you think about it, if you are a perfect clicker, that’s a minimum of: file-save as- save as step- pick file location- pick name of file- save, 75 to 100 times.
But wait: Your part goes into review, and someone wants a quick fix on a typo on your drawing. Repeat the clicks. And then, someone else wants another change, and you upload your file to the China Manufacturing parts, Inc. platform and see that your hole diameter to depth ratio is not machineable. Repeat the clicks again. Oh, and you want to test it for 3D printing and need an STL. Click, click click. You realize you made a mistake. Update your model and click click click, again and again.
Engineer your way to a better solution by learning to code. As Smokey the Bear would say…”Only YOU can prevent carpal tunnel.”
Coding ultimately saves time; it’s just a muscle you have to work out for it to get stronger. If you don’t start, you’ll never get better.
Why code? A script is entirely easier to review than, say, an Excel sheet (I used to TA for 3 classes of 60 students, plus my own engineering work —> no script, no help).
Excel sheets can be organized any which way, and most users don’t assign variables–they give cells values. F=ma. Something simple can turn into =c6*$f$3…and that’s simple, but already, you have no context what that means, without hunting in a spreadsheet trying to decode the original user’s Excel organization.
Now, start actually doing unit conversion, adding in constants, and then everyone starts doing it differently inside the Excel matrix. F=ma in a script—well, it should automatically trigger some apple-falling-from-the-tree thoughts.
With code, on the other hand, you can follow it step by step, and it’s easier to see fundamental engineering errors. Syntax will work itself out, because else: # your code will not run. This, in and of itself, helps make reviewing engineering work more efficient for everyone involved.
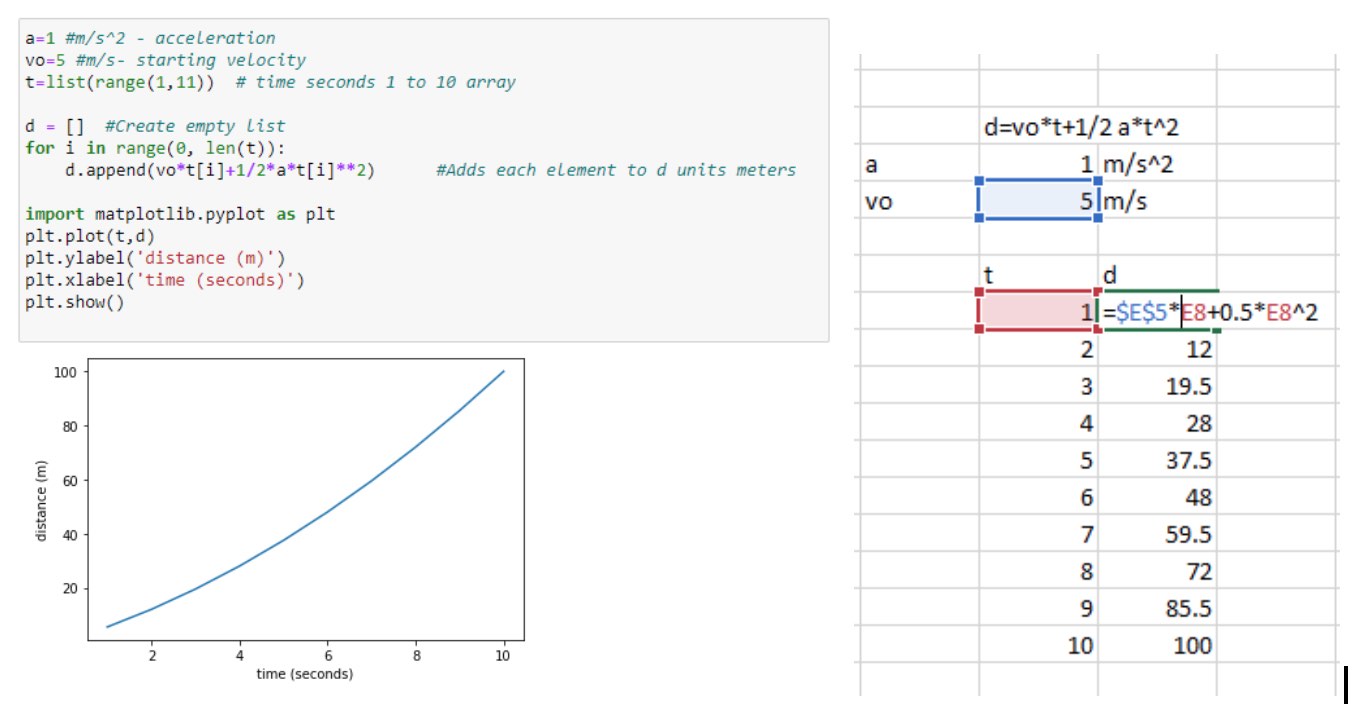
See my two side-by-side comparisons below, where I show a very basic engineering equation in Python and in Excel. The Python example is self-contained, and someone should be able to review it very quickly. The Excel example isn’t hard and can be decoded, but $E$5 doesn’t mean anything, unless you figure out what E5 is inside the sheet.

If your goal is to create a usable document, knowing how you got to the numbers in front of you is as important as the numbers you end up with. And knowing how you got to your answers is easier with a script. That script can allow you to speed up every task like it from that point on, with a little bit of upfront work. Hey, it’s more interesting than copy-pasting for hours every day.
I delved into C, C++, and MATLAB in college and ended up in a job where everyone used Excel. While I clearly wasn’t going to be able to convert a Fortune 500 company to MATLAB (although I have always succeeded at getting at least one license), I taught myself Visual Basic (VBA) macros and to write code that could fully automate gigantic spreadsheets and reports for Interface Control Documents (ICDs) for jet engines.
Without code, someone could handle 30-50 ICDs. With code, the same person could handle 200 ICDs and multiple different engine programs.
This is how I ventured into VBA: because I hated copying and pasting all day. Later, I learned that VBA could be used inside Solidworks, NX, and basically all Windows applications.
To help you actually apply what I’ll teach you in this post, including how to get started with some basic VBA, a zip folder of Macros to increase efficiencies in Solidworks, and scripts for “Save as STEP” and “Export as PDF”, download this supplementary tools slide deck.
Setting up Macros in Solidworks
Now, I’ll teach you how to add two of my most used Macros to Solidworks, to help you be more efficient. One exports your current Solidworks CAD file as a step to a folder on your desktop. The other exports your DWG file to a PDF file, to a folder on your desktop. This will allow you to upload them to China Manufacturing parts’s website faster, saving you clicks.
These two Macros will export your open DWG to PDF and append drawing pages for multi-page DWGs. One macro will also append the rev letter to the end of the file, if you use it. The other macro will export STP and append rev if you use the rev property in the SW file.
Download the supplementary tools here for a zip folder of Macros.
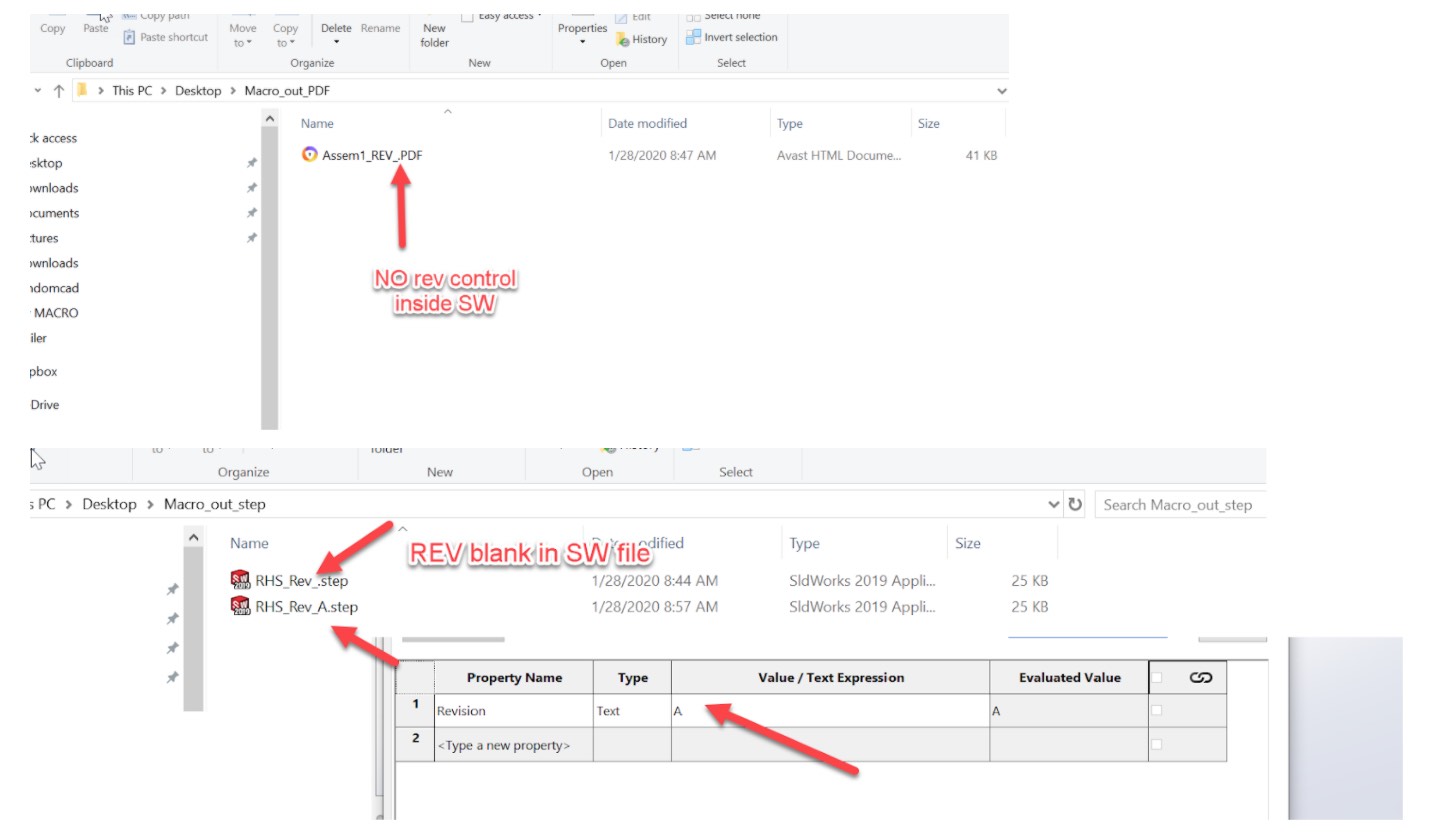
To get the rev letter to appear, you need to use the property feature (File>>properties). If you don’t put that in or have anything in that value box (see images below), you will not get your rev control.

Fun fact: Here, if you look at the code, you could also automatically export other properties. If you look for the property towards the end of the code, you can see how you search for “Revision” and get its value. If you use Solidworks and define the material as an example, you should be able to figure out how to extract that from your properties in your code.
Table: Script for getting revision and saving as step

You can also see how save as “step” is done. You could easily make this macro save as an “.stl” I bet you’re smart enough to figure that out. (Make sure to save it as a new script and make it its own button, so you can still make steps, too!).
How to Add These Macros as Buttons Inside Solidworks:
For the step export, you want to be in the part environment (modeling area) to add a button (as this is where your CAD file is).
For export PDF, you want to be in the DWG environment (as this is where your SWDW is).
Edit these Macros:
Sw>>Tools>> Macro>>Edit
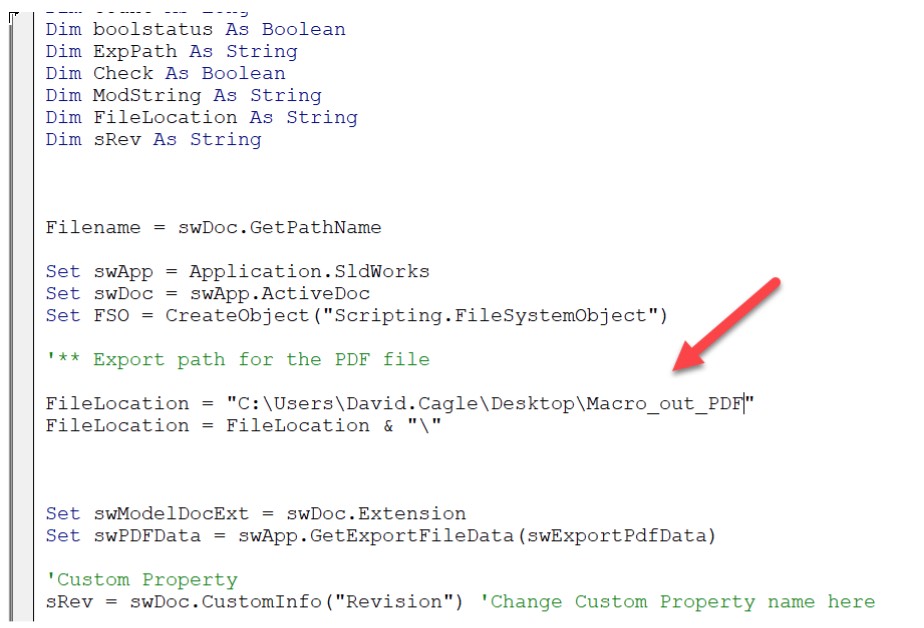
Under the file location, copy and paste in a location of your choice for the output of both macros in between the quotes “your_file _location“:
The reason this is hard-coded is to speed things up. Guiding you to select the directory doesn’t help speed you up. I only export stuff when I’m sending it elsewhere (quality release, China Manufacturing parts, etc).
Note: You actually have to create a folder and copy its location. The code will not auto-generate this folder for you if it doesn’t exist. In Tables 1 and 2, I’ve copied the code to show you in red highlighting where you need to update your code to work.
Here is a screenshot of the edit tool from inside the Solidworks VBA edit window:

Code Can Help You Get Work Done Faster
I learned to code in college because I had to. Then, I learned it better because it was the only way I could handle all my TA and RA responsibilities, while also managing my own workload. That perspective then rolled into my work life because it was always the same—too much to do, and not enough time. I encourage you to do the same, in order to maximize your efficiency and save you clicks (and save your wrists).
Don’t forget to download the supplementary tools to help you get started.
And speaking of efficiencies, China Manufacturing parts, Inc. exists to help speed you up and alleviate you from frustrating admin work (!) so your smart engineering brain can be focused on creating the next big thing. So be sure to check out our digital manufacturing platform for instant quotes, automated DfM, and access to a wide range of capabilities for mechanical parts through a single platform.

