Time to read: 4 min
It’s always a good idea to go through several drafts of any design before finalizing a part. Prototyping can help you get the right design, but you’ll need a different type of draft for a successful injection molded plastics project.

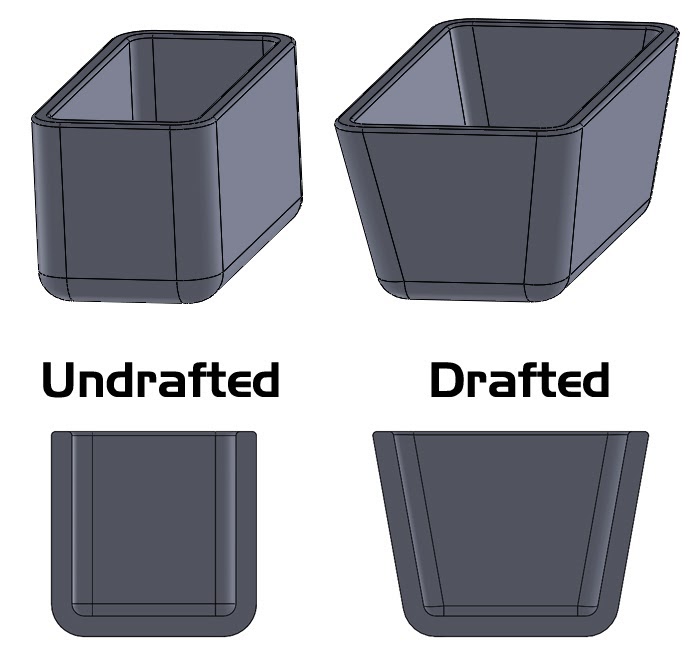
In injection molding, draft is the angle that you apply to the vertical walls of parts. Without adding draft to your design, parts won’t eject cleanly from the mold and are susceptible to damage. Draft can also decrease tool wear and reduce cooling times, both of which help to control costs.
Draft is a simple concept, but applying it is anything but — there isn’t a single angle you can apply to every part because different injection molding materials behave differently. Different plastics melt at different temperatures and have different shrink rates. Plus, different part designs have different features and dimensions, and the type of surface finish and the ejection mechanism that you use all affect the draft you need.
There’s also the matter of texture, which determines the minimum draft angle for injection molded parts. This article provides the general guidelines you can apply to help you get it right. And using this guide while working with an injection molder who provides design for manufacturing (DFM) feedback will ensure your draft angles are where they need to be.
Why You Need Draft
Plastic injection molding melts a thermoplastic material so that it flows into and fills a mold’s geometry. Those molded parts are then cooled so that they solidify and are finally ejected from the injection molding machine. Different thermoplastics behave differently, but all shrink during cooling. Still, this temperature-based size reduction is not enough to ensure that molded parts eject cleanly.

By applying a draft angle in the direction of the mold’s movement, designers can leave enough room for the part to exit when the mold halves separate. Without that additional space, parts can stick in the mold. Inadequate draft may also cause the mold’s ejector pins to mar the part’s geometry or surface finish. Using a mold release agent can help, but chemical reactions that cause blemishes may require secondary finishing for added costs.
Warped geometries, parts scuffing, and blemishes aren’t the only risks either. Inadequate draft also contributes to mold wear because of the rubbing, and resulting friction, which happens when there’s not enough room for parts to readily clear the mold. Because tooling is a major cost driver, it’s worth preventing premature or excessive wear that can remove an injection mold from service and require unplanned repairs. Injection-molded parts without enough draft also take longer to cool, which extends cycle times.
Draft and Texture: Best Practices
By following some best practices for injection molding draft, designers can avoid these problems and succeed with parts where features such as ribs, walls, posts, and bosses can complicate ejection. As a rule, it’s best to apply as much draft as possible. A good rule of thumb is to aim for 1 degree of draft per 1 inch of cavity depth; however, that can change based on factors such as your desired finish or the material you use.
Texture is an especially important consideration because parts with a smoother finish are easier to eject. Typically, plastic injection molders recommend 3 degrees for light textures and 5 degrees or more for heavy textures. Parts with a leathery or snakeskin-like finish have small undercuts and may require 10° or more of draft. In general, however, it’s best to add 1.5° of draft per 0.001” or 0.025 mm of textured depth.
Mold construction is another critical consideration when determining draft. If the mold’s parting line is stepped, a special surface called a shut-off is needed to prevent a gap between the mold haves when they’re closed. The shut-off shouldn’t be exactly parallel to the mold’s draw direction, however, because that can cause drag and cause the tool to wear over time. To avoid this, designers usually apply a 5° to 7° draft angle.
Additional Considerations: Consistency and Direction
Part designers familiar with plastic injection molding guidelines know that it’s best to design parts that have a uniform wall thickness. Otherwise, parts may exhibit sink or warp and fail to meet dimensional or functional requirements. By using a consistent draft angle throughout the part, designers can also minimize internal stresses that cause warping and curling.

The proper placement of the mold’s core (A-side) and cavity (B-side) are also important to consider. Otherwise, the part may not stay in, or stick to, the half of the mold that contains the ejector system. For example, in the case of a rectangular part with four through-holes, drafting the holes toward the A-side could cause the parts to stick to the mold’s core rather than its cavity. A better approach would be to draft the holes toward the B-side so that the parts stick to the cavity, which is the half of the mold where the ejector system is located.
Draft the Right Partner for Your Project
When it comes to injection molding part design, some draft is always better than no draft. But what’s the right amount of draft for your parts? For light textures, draft angles between 1 and 5 degrees are typical. For heavier textures, draft angles between 5 and 12 degrees may be required. For the best, most cost-effective results, think about draft early in the design process and partner with an injection molder who can provide DFM feedback to dial in your design.
China Manufacturing parts provides free, instant DFM feedback, and our network of experienced injection molders will ensure your next plastic injection molding project is a success. We have the resources, know-how, and production capabilities to deliver the quality parts you need. Create an account and get an instant quote today!

